The Making Of…Chestnut Complex
The Fredericton piece began much the same way as the Wolfville piece did, with a flood of research.
I asked the Director of Gallery ConneXion, John Cushnie, if he knew the history of the building that the gallery resides in. Turns out the gallery is in the basement of what used to be the old Chestnut Canoe Factory.
My local library had two books on the history of the Chestnut Canoe. I discovered that Chestnut Canoes are a nostalgic part of Canadian history – a part that I, as a landlocked London, Ontario lass, never had the chance to partake in. According to many, back in the day you could find a Chestnut Canoe in almost every yard on the East coast.
Branching out from the hardware business, the Chestnut family profited from the romantic wilderness of Fredericton’s early years, producing canvas covered wood canoes and working as guides on canoe/hunting excursions. When canoes began being constructed out of plastics in the second half of the 20th century, Chestnut couldn’t compete price-wise. This wasn’t the only factor in the fall of the company, and in the late 1970s New Brunswick made its last Chestnut canoe.
After the company went bankrupt the collection of Chestnut canoe molds was broken up and sold to various companies and individuals across Canada. None of the molds remained in New Brunswick; I saw this as the extirpation of the Chestnut Canoe.
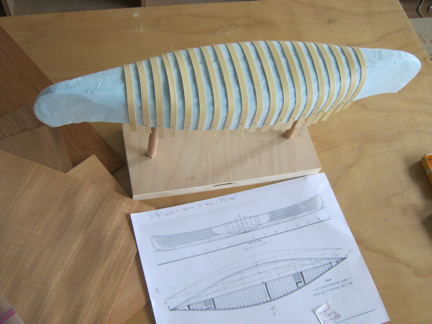
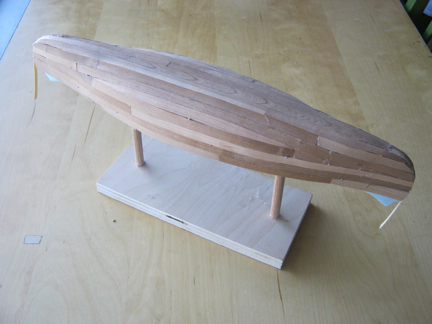
I had decided the piece was going to include at least one canoe so I set about figuring out how I was going to build one. Using the plentiful photographs and information found in When The Chestnut Was In Flower: Inside The Chestnut Canoe (Roger MacGregor) I made a 1:8 scale mock up fashioned after the dramatically shaped Indian Maiden by carving a mold out of laminated strips of styro insulation. Next I soaked ribs of veneer, bending and securing them along the mold.
Once the ribs were dry I used more veneer strips to plank the sides of the canoe.
When the wood canoe was complete, I stretched cotton muslin over the form, fitting and gluing from the centre out.
In the end, because I had just worked from the idea of what I thought a canoe looked like and not from exact scale calculations, the canoe was completely the wrong shape and much too small to accommodate my figures. I stopped working. I carved another mold, larger and more correctly shaped. Ribbed and planked. It was still much too small. I needed to do some real math.
For the canoe to “fit” my figures it needed to be 1:4 scale, this meant a 48” long, 8.5” wide mold. Much larger than I realized, not ever having been around canoes and not knowing that they are quite long in relation to a person’s height. I bought more styro, carved another mold, cut my veneer strips a little wider, and made another canoe – this time it actually looked like a canoe. 🙂
Wood/canvas canoes require a canvas filler that is rubbed into the canvas and allowed to dry for a month before sanding and painting. I didn’t have that kind of time, and I needed to use something that would smooth out the rough curves. I started with plastic wood filler (which was horrible to use). An employee from the autobody business across the alley saw me working outside and said, “I have something better.” He left and returned a few minutes later with a top coat body filler known as “icing”. Appropriately named, it spread easily, dried quickly, and sanded smoothly.
Satisfied with the surface, I primed and painted. To finish the canoes, I needed to add details on top of the paint, but I couldn’t handle them until the surface was dry – they stayed tacky for the better part of a week and caused me a bit of panic.
While the paint dried I turned my attention to the figures. How many should there be? What would they look like?
Tomorrow: the Fredericton piece, continued…

